存储资源
和机器资源不同,存储资源是需要自己手动添加的。因为 CubeStudio 的分布式存储是用户自己提供的,所以用户需要自己配置分布式存储的信息。
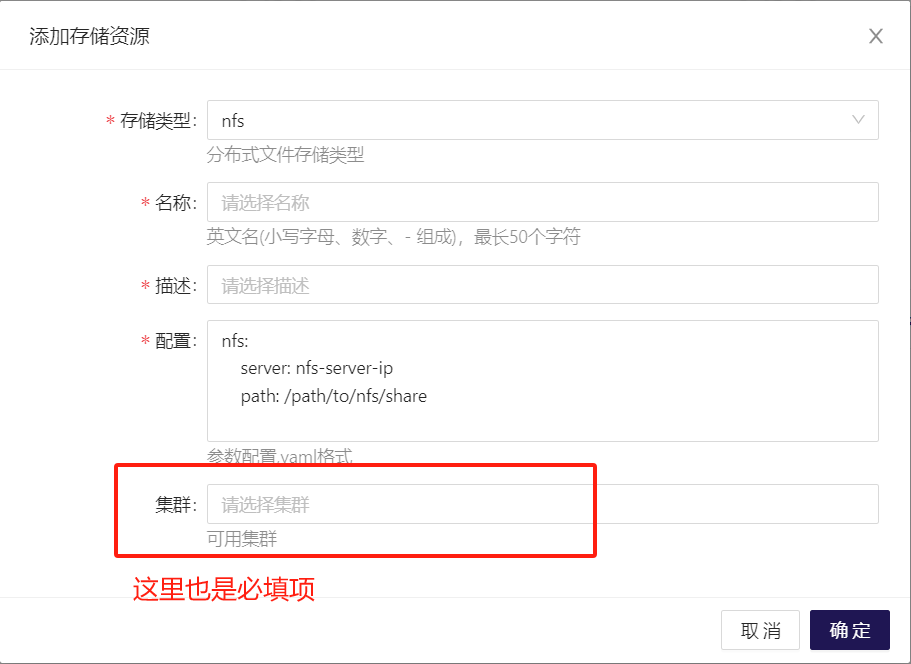
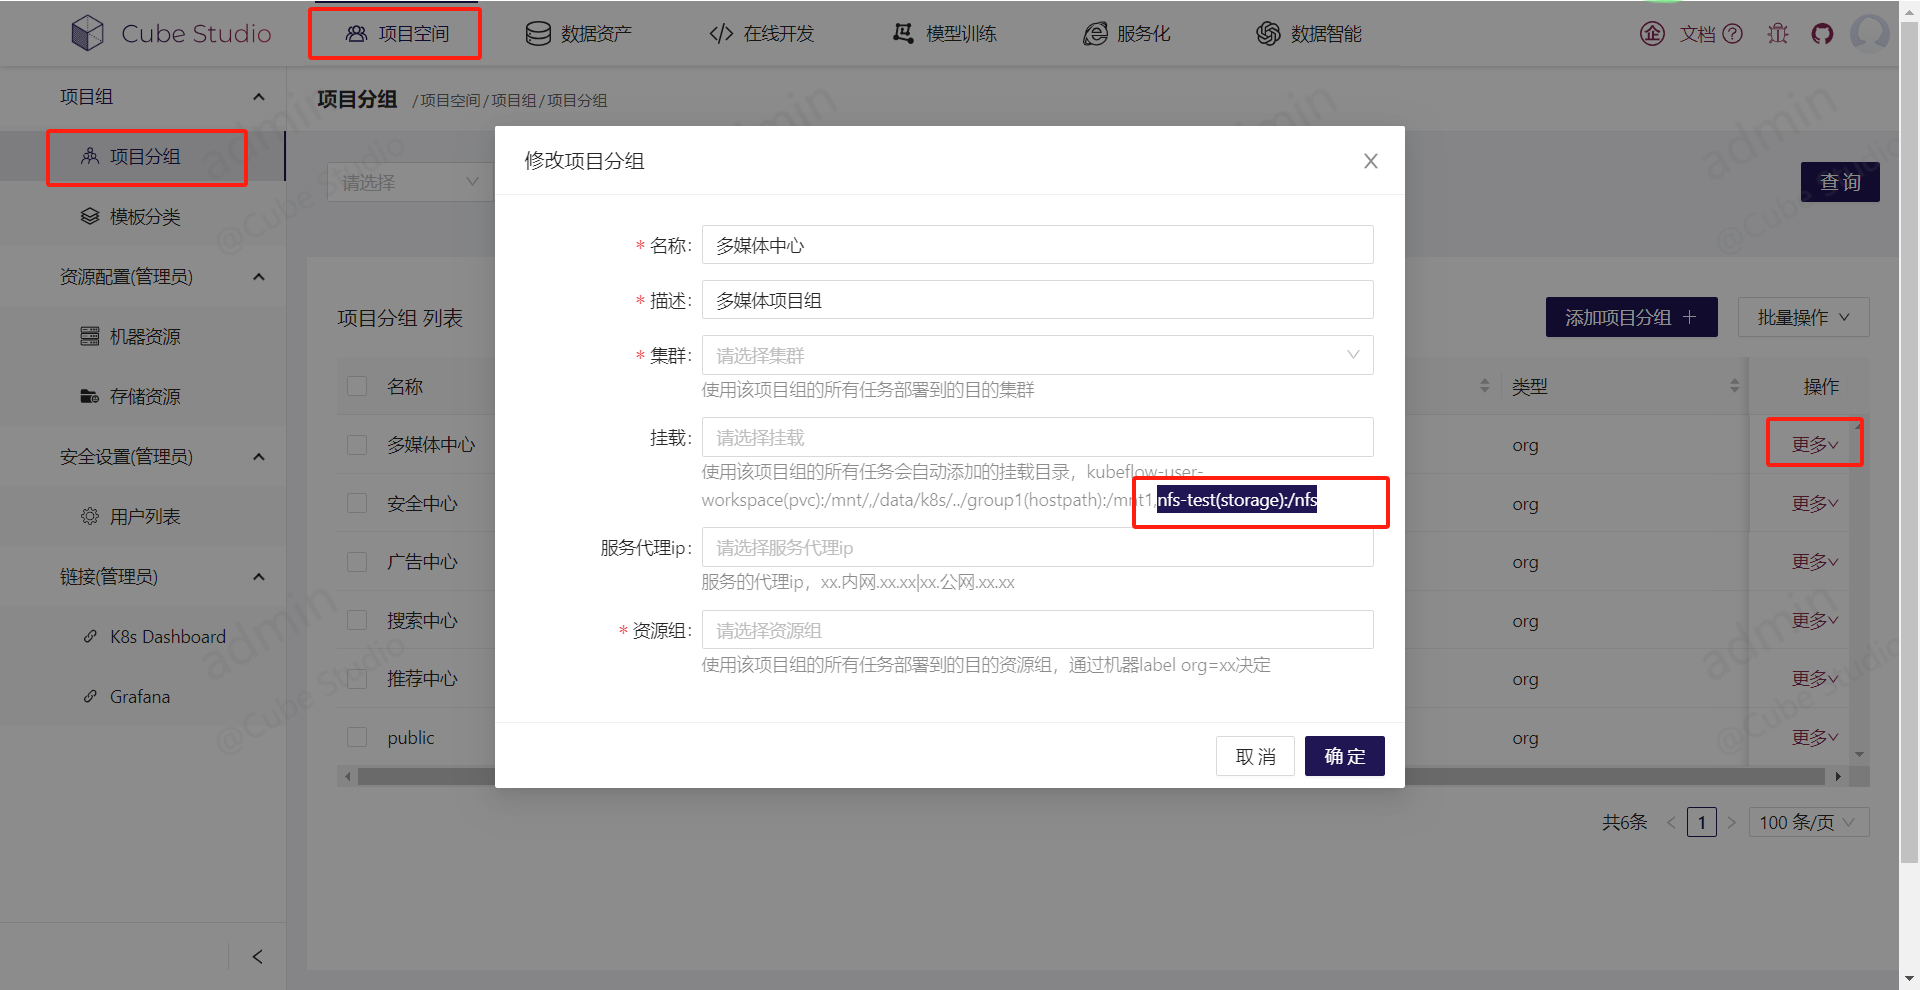
存储资源挂载绑定的“集群”是必填项(表单 clusters 字段 DataRequired)。添加好存储资源后,需要点击 “mount” 按钮挂载成 pvc 才可以使用,并且需要在项目组中添加相应的挂载配置(项目组 volume_mount 中以 存储名(storage):/路径 引用,见 项目空间)。
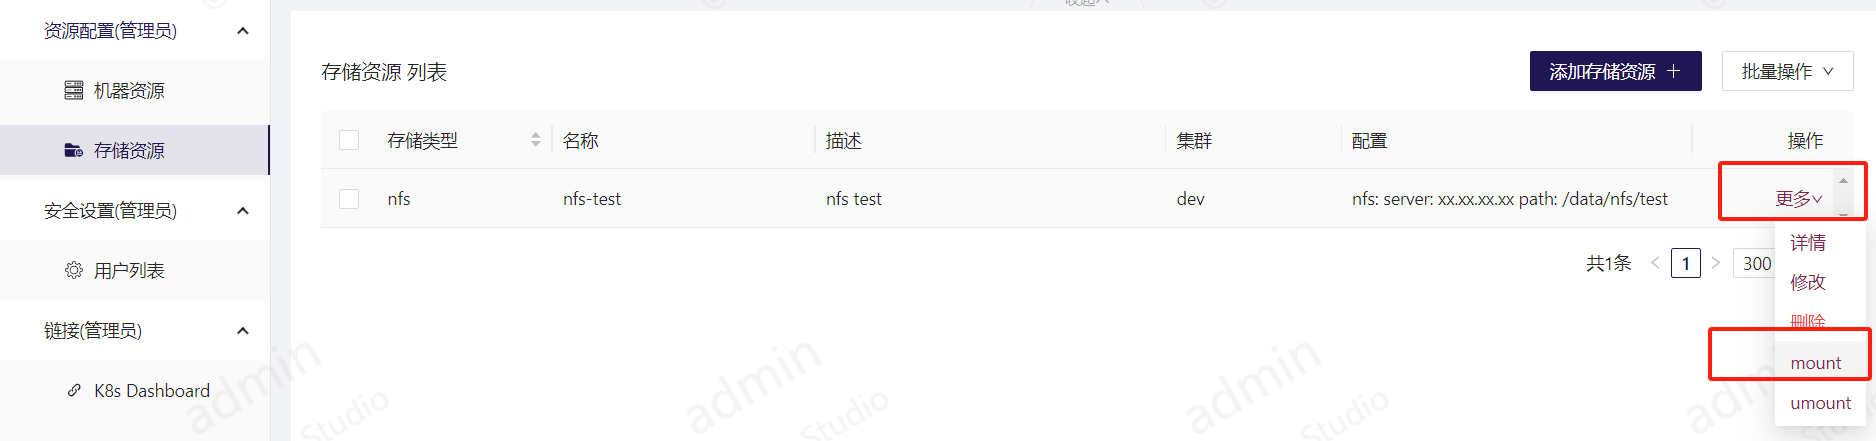
支持的存储类型(表单
storage_type可选值,见myapp/views/view_resource_storage.py:70):nfs(默认)、cfs(腾讯云)、cos(腾讯云)、nas(阿里云)、oss(阿里云)、s3(s3/minio)、glusterfs、cephfs、自定义。mount 行为(见
myapp/models/model_storage.py的k8s_resource_list与view_resource_storage.py的mountaction):会在pipeline、service、jupyter、automl四个命名空间下分别创建 PV(名为命名空间-存储名)和 PVC(名为存储名),默认容量10Gi、访问模式ReadWriteMany、回收策略Retain;带密钥的存储(cos/oss/s3/cephfs 等)会在kube-system命名空间下创建对应 Secret。卸载用 “umount” action。存储底层(CSI 插件部署等)准备参见 02-部署安装 段。
cfs
腾讯云购买 cfs 存储。
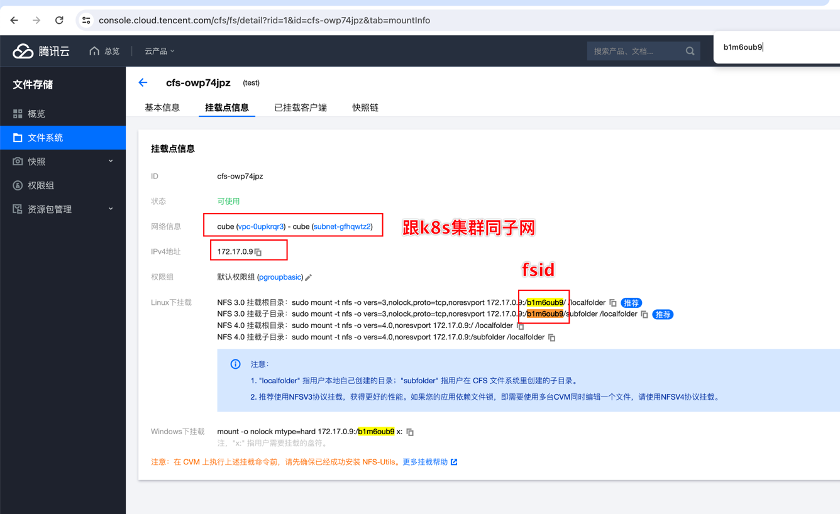
自建 k8s 挂载,需要参考 https://github.com/TencentCloud/kubernetes-csi-tencentcloud 部署插件。
配置示例(yaml,对应表单默认值):
csi:
    driver: com.tencent.cloud.csi.cfs
    volumeAttributes:
      fsid: xx
      host: xx.xx.xx.xx    # 需要与k8s集群同一个区
      path: /xx/           # 需要确保目录存在
cos
腾讯云购买 cos 存储。
账号密钥参考:https://console.cloud.tencent.com/cam/capi
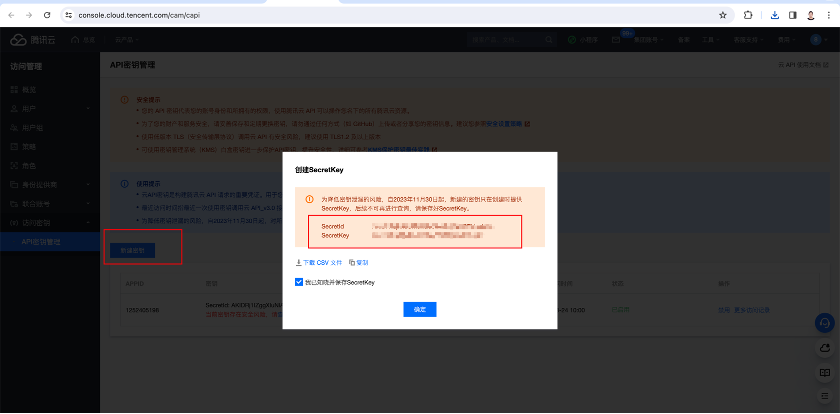
自建 k8s 挂载,需要参考 https://github.com/TencentCloud/kubernetes-csi-tencentcloud 部署插件。
配置示例(yaml,对应表单默认值;SecretId/SecretKey 会被抽取为 Secret):
csi:
  driver: com.tencent.cloud.csi.cosfs
  SecretId: xxxx       # https://console.cloud.tencent.com/cam/capi
  SecretKey: xxxx      # https://console.cloud.tencent.com/cam/capi
  volumeAttributes:
    url: http://cos.ap-xxx.myqcloud.com    # 需要在同一个子网下
    bucket: xxx
    path: /xx
nas
阿里云购买 nas 存储。
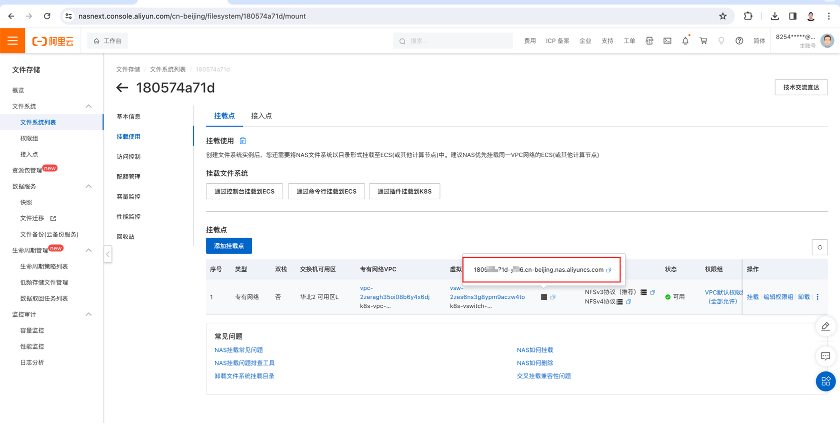
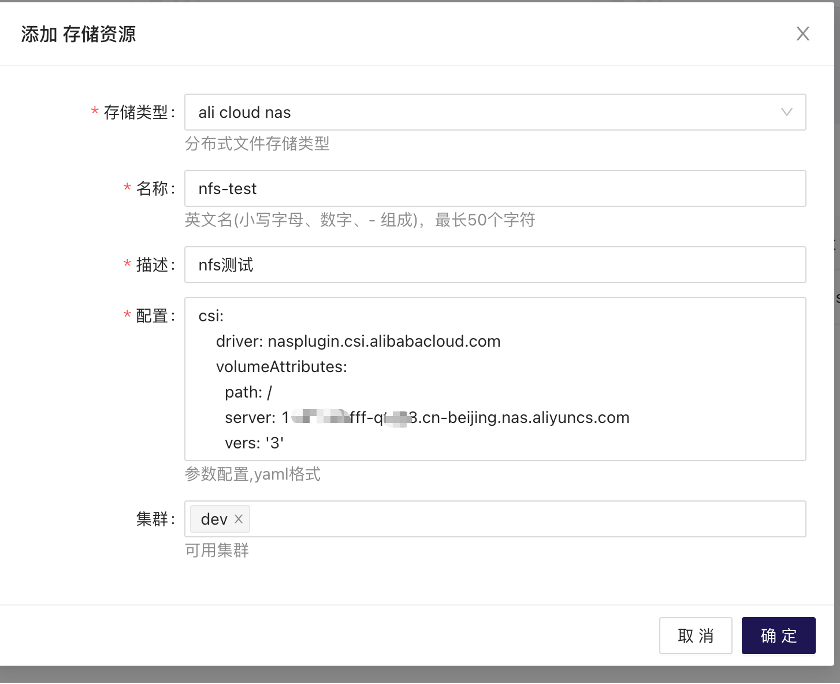
配置示例(yaml,对应表单默认值):
csi:
    driver: nasplugin.csi.alibabacloud.com
    volumeAttributes:
      path: /xx/xx           # 需要确保目录存在
      server: xx.cn-xx.nas.aliyuncs.com   # 需要在同一个子网下
      vers: '3'
oss
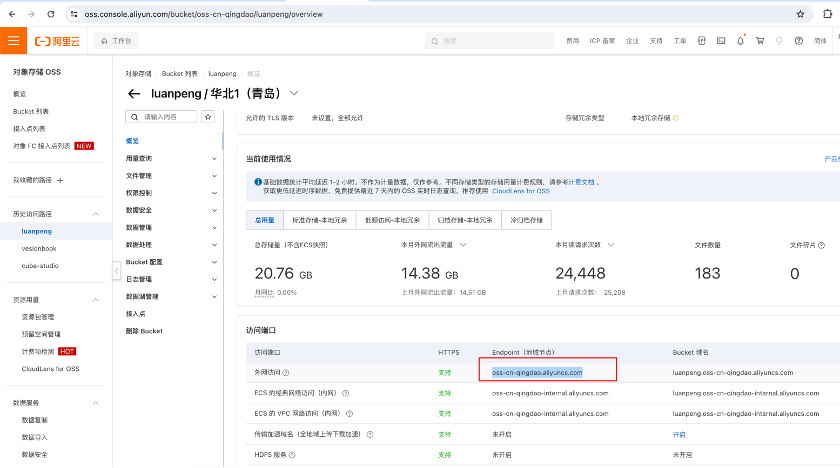
阿里云购买 oss 存储。
id 和密钥:
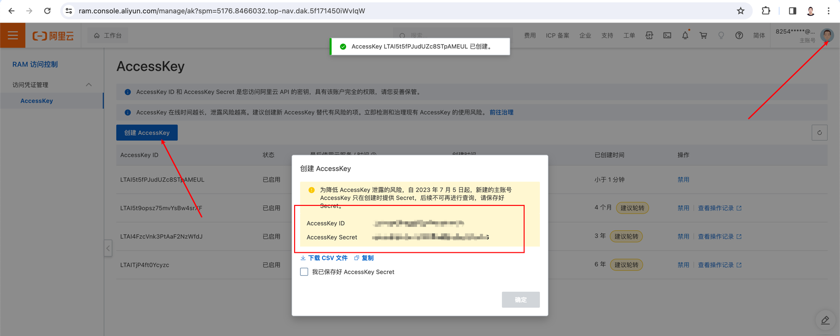
oss 地址:
配置:
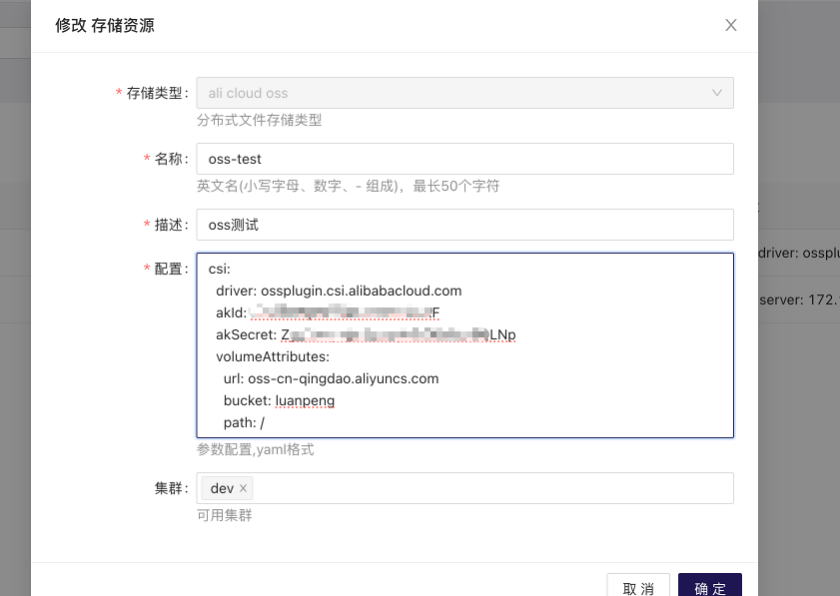
配置示例(yaml,对应表单默认值;akId/akSecret 会被抽取为 Secret):
csi:
  driver: ossplugin.csi.alibabacloud.com
  akId: xxxx
  akSecret: xxxx
  volumeAttributes:
    url: your-oss-url.aliyuncs.com    # 需要在同一个子网下
    bucket: XXX-1251707795
    path: /osstest
s3
开放 kubeflow/minio 服务。
csi 方式
参考:https://github.com/yandex-cloud/k8s-csi-s3 部署 csi 驱动。
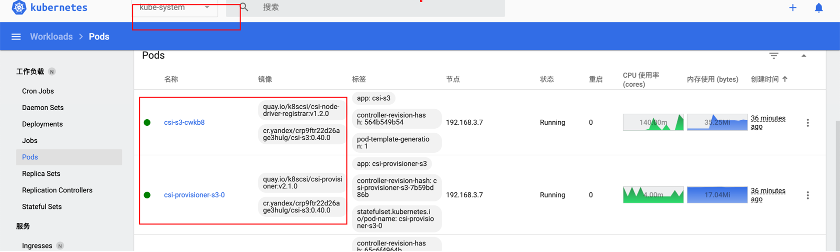
设置 minio 为外部存储:
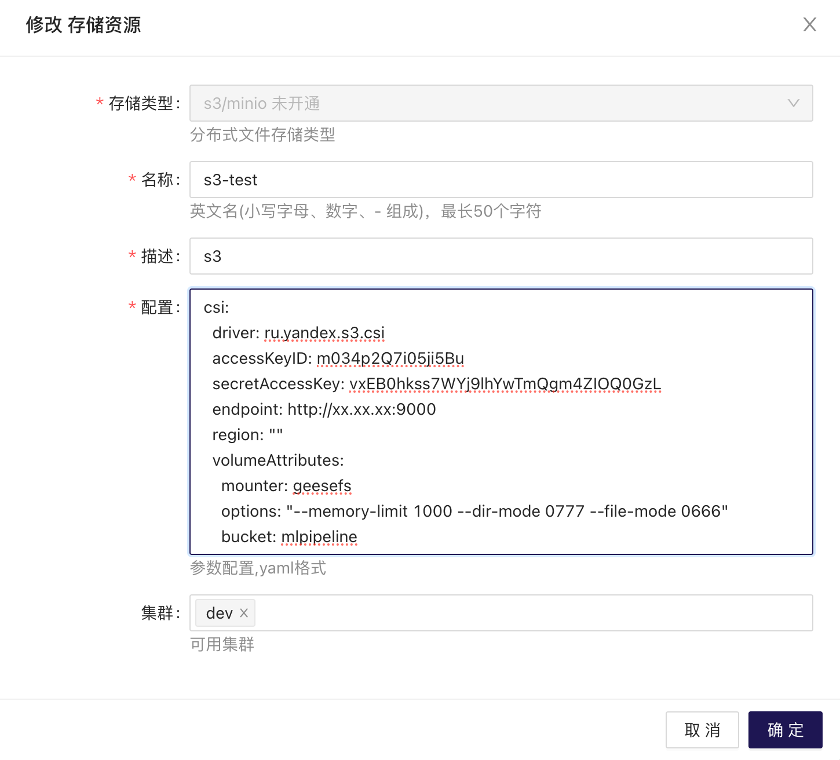
配置示例(yaml,对应表单默认值;accessKeyID/secretAccessKey/endpoint/region 会被抽取为 Secret):
csi:
  driver: ru.yandex.s3.csi
  accessKeyID: xxxx
  secretAccessKey: xxxx
  endpoint: https://xx
  region: ""
  volumeAttributes:
    mounter: geesefs
    options: "--memory-limit 1000 --dir-mode 0777 --file-mode 0666"
    bucket: xx
另外一种方式
容器中安装插件:
sudo apt-get install -y fuse
# 或者
sudo yum install -y fuse

wget https://github.com/yandex-cloud/geesefs/releases/latest/download/geesefs-linux-amd64
chmod a+x geesefs-linux-amd64
sudo cp geesefs-linux-amd64 /usr/bin/geesefs
容器尝试挂载:
export AWS_ACCESS_KEY_ID=xxxxx
export AWS_SECRET_ACCESS_KEY=xxxxx
mkdir /test
geesefs --endpoint http://192.168.3.7:9000 test /test
glusterfs
容器部署 glusterfs 存储:
docker run -d --name gluster \
  -v /etc/glusterfs:/etc/glusterfs:z \
  -v /var/lib/glusterd:/var/lib/glusterd:z \
  -v /var/log/glusterfs:/var/log/glusterfs:z \
  -v /sys/fs/cgroup:/sys/fs/cgroup:ro \
  -v /dev/:/dev --restart=always \
  -v /glusterfs/:/glusterfs \
  --privileged=true --net=host \
  gluster/gluster-centos

docker exec -it gluster bash
systemctl status glusterd
gluster peer probe 192.168.3.7   # ip为机器ip
# gluster volume create testvol localhost:/glusterfs/vol1 force
gluster volume create testvol transport tcp 192.168.3.7:/glusterfs/vol1 force

gluster volume start testvol
gluster volume info
echo "aa" >> /glusterfs/vol1/aa


# 主机客户端测试
apt -y install glusterfs-client
# 或者
yum install -y centos-release-gluster glusterfs glusterfs-fuse

mount -t glusterfs 192.168.3.7:/testvol /mnt
cat /mnt/aa
web 界面配置:
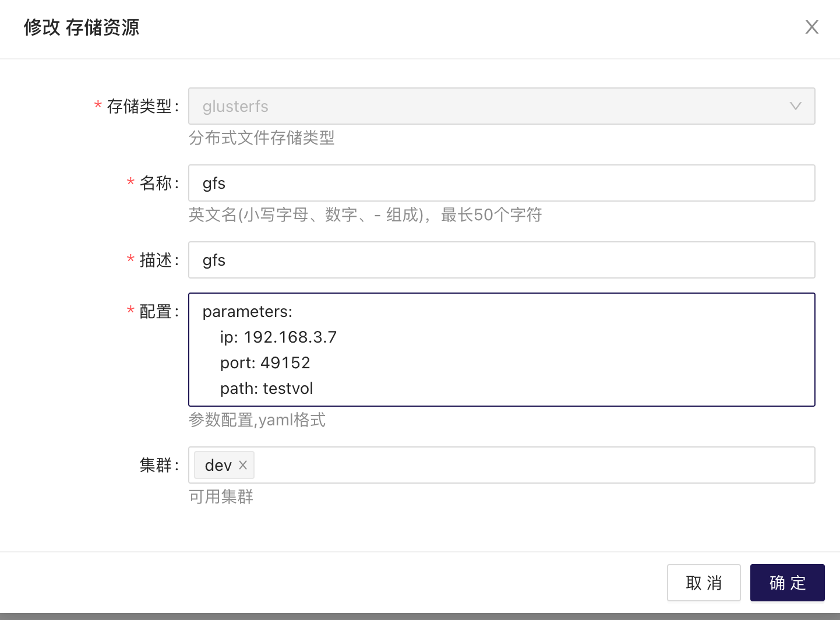
配置示例(yaml,对应表单默认值;平台会据此创建 Endpoints/Service 连到 gluster):
parameters:
    ip: xx.xx.xx,xx.xx.xx,xx.xx.xx
    port: 49152
    path: testvol  # gluster volume create NAME
cephfs
前提条件:创建 ceph 文件存储。
查看管理密钥:
root@node0:~# cat /etc/ceph/ceph.client.admin.keyring
[client.admin]
    key = <密钥>
    caps mds = "allow *"
    caps mgr = "allow *"
    caps mon = "allow *"
    caps osd = "allow *"
如果 ceph 为单独文件存储机器,需要复制以下两个文件到 CubeStudio 管理节点:
scp cephserverip:/etc/ceph/ceph.conf /etc/ceph/
scp cephserverip:/etc/ceph/ceph.client.admin.keyring /etc/ceph/keyring
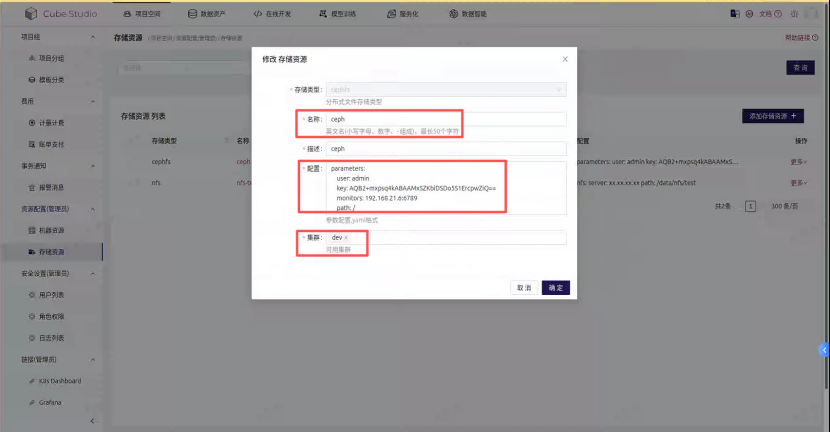
在配置处,将 ceph.client.admin.keyring 的用户名、key 填写在配置当中:
- Monitors:监视器
cephserverip:6789 - Path:ceph 文件存储路径
- 集群:选择对应集群,集群中才会创建 ceph pv
配置示例(yaml,对应表单默认值;key 会被抽取为 Secret):
parameters:
    user: admin     # ceph认证用户
    key: 秘钥
    monitors: xx.xx.xx:6789,xx.xx.xx:6789,xx.xx.xx:6789 # ceph集群mon节点
    path: /
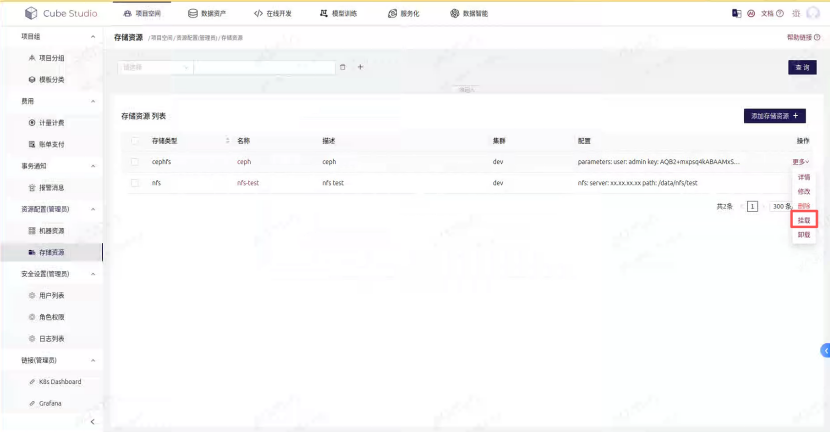
ceph 配置填写完毕,点击挂载:
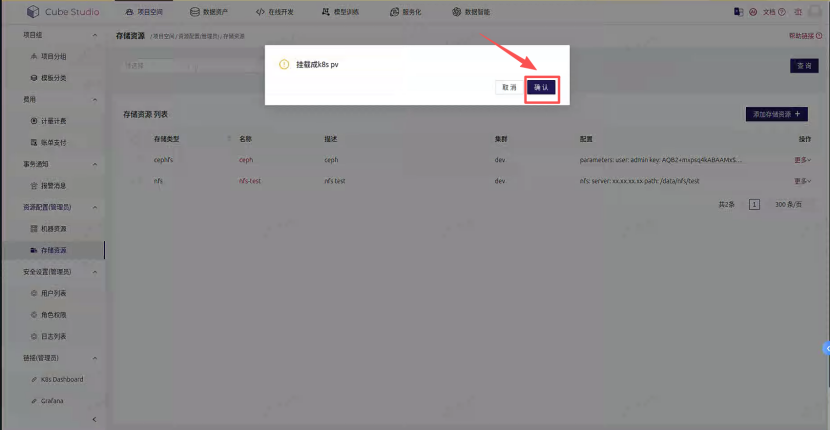
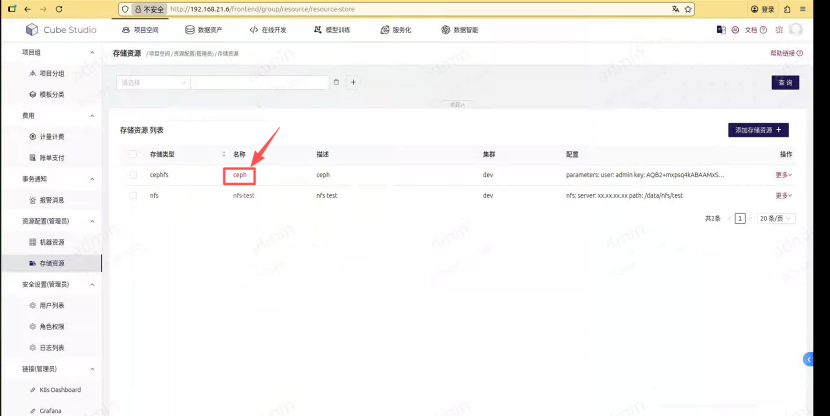
点击 ceph 名称:
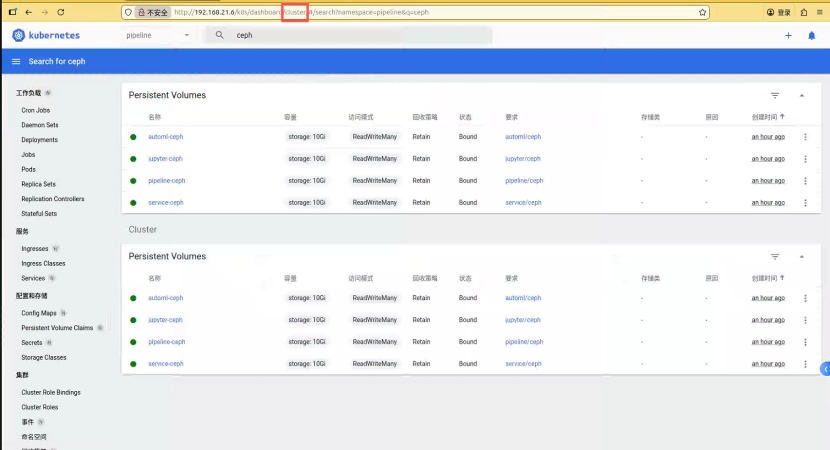
可以看到已经存在 xxxx-ceph 的 pv:
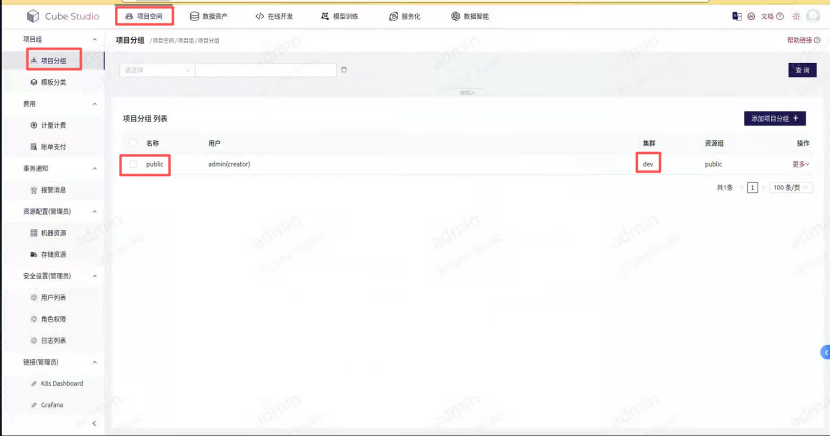
Public 项目分组下的集群为 dev(项目组与挂载配置见 项目空间):
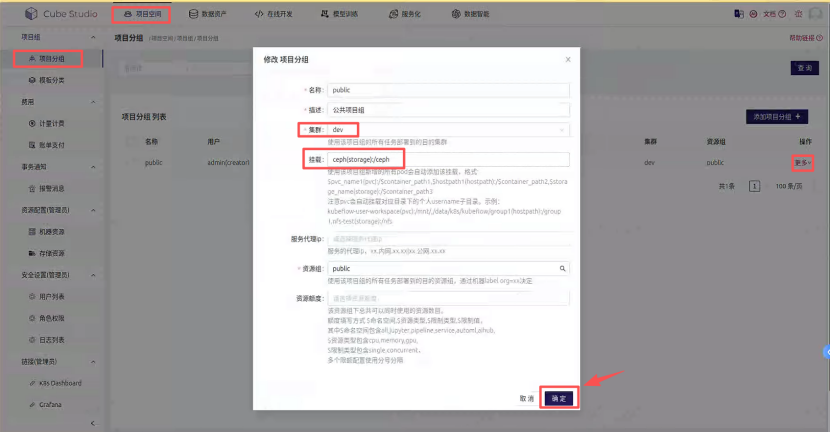
修改项目分组下的挂载:
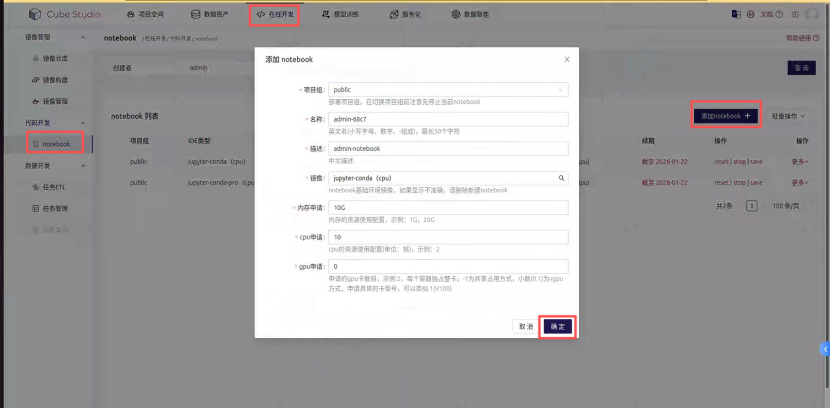
选择上方添加挂载的项目组:
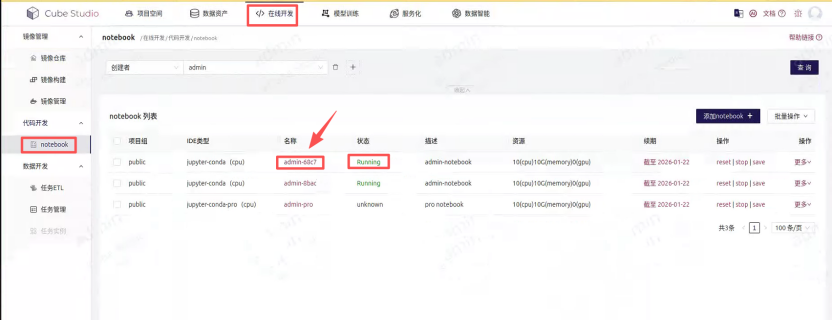
等待 notebook 状态 running,点击名称进入 notebook:
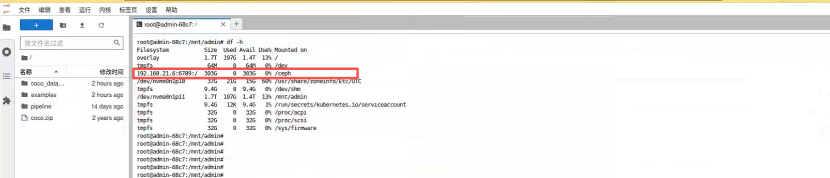
df -h 可以看到已经添加 /ceph 的挂载。